Tuesday, January 18, 2011

The Complete Greeting card


And this is the final result. Im done!Greeting card for valentines day, 14 Febuary 2011. HAPPY VALENTINES DAY!

The Step How I create a greeting card


First step, i Open new file.Then I divide it into two side by using Line Tool.


 second step i open the new images. I used rectangular marquee tool. After that i use Magic wand Tool to select the image and i copy and paste it in a new layer


 step 3 i adjust couple picture colour. I used colour balance to adjust the image colour. Go to IMAGE > ADJUSTMENTS > COLOR BALANCE

  before
After
After that i do brightness and contras for the image. U can see image chages.The original is too dark in both the highlights and shadow areas. In order to make the couple more visible, it is necessary to lighten the image. From the top menu tabs, select IMAGE/ADJUST/BRIGHTNESS-CONTRAST


Step 4 I insert the couple and love picture. Drag to the new layer.Multiply the picture and adjust the opacity.


Step 5 i Insert the love poem using Horizontal Type Tool and insert love picture to the couple image. i Multiply the picture and adjust the opacity


 And the last step i insert the text " Happy Valentine's Day" using Horizontal Type Tool and i change colour for valentine's

My References


All i have from google

Assignment 3 - Greeting card

Create a greeting card for any celebration such as Birthday, Anniversary, Graduation etc. The size of the greeting card should be A4 (one side the picture, the other side the greeting). The images used in the greeting card MUST BE ORIGINAL and NOT CUT and PASTE. The greetings (wordings) has to be original as well.

Tuesday, December 14, 2010

The Complete E-wallpaper


Students are to create a digital image as a wall paper. The event or theme is MMU FOM Open day dated March 21st, 2011.The items i found from the internet and the FOM picture by my friends.

Assignment 2 - E-wallpaper


First step : 
I'm using Adobe Photoshop CS4  for doing e-wallpaper.
I chose for the gradient tool. Draw a line from the top until bottom.


I would like to make the picture looks nice, so i adjusting the colour.


Step 2 : i Import the first picture which is FOM building and transform it by scaling.


I set the value for the radius of the gaussian blur.


Step 3 : I used rectangle marquee tool. 
I added the second picture and make the same effect same as the first FOM picture. I used the move tool to move the rectangle layer, to make the 2 pictures next to each other


Step 4 : Here, I placed a background texture that I've chosen from internet.


Step 5 : I filled the box and ellipse tool by white color. i change the style of the gradient. (foreground to transparent). 


Step 6 : Then, i write the text or details inside the box (venue and time) by using the horizontal type tool. I used red colour for  the title Faculty of management.


Step 7 : I added a TM logo and place the MMU mascot. i deleted the white background using magic eraser tool and make a border, by right-click on the layer > blending option > stroke > change the size.

Monday, November 29, 2010

The Complete Face


The face will be made out of the various fruit and vegetables.The items found from the internet.Use Photoshop to create the most attractive face with colours as well as at the highest and most professional quality possible.

Assignment 1 - Face


First step :
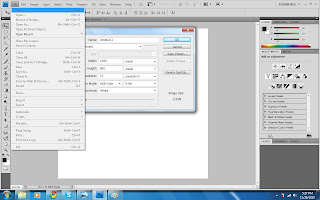
Create a new photoshop document. Open photoshop and create a new document [File > New].
In the dialog box enter the width and height of the layout. I usually design for a width of 1280 pixels width. This works well in monitors with 800 resolution for the browser scroll bar. The resolution for the web is 72. For the background,you can choose between white,background color (the color will be taken from the background color specified in the toolbox)or transparent background.

Step 2 :
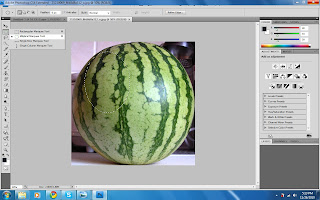
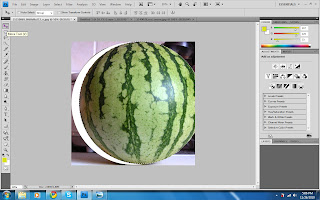
I want create a face. I use the Elliptical Marquee Tool to select the watermelon.
To create a selection in the toolbox, select the elliptical marquee tool click on the image and drag.
To add an ellipse to existing selection you have either to choose Add to selection option on the Options bar or to press and hold [Shift] key while selecting.
To subtract an ellipse from existing selection you have either to choose Subtract from selection option press [Alt] key while selecting.
To intersect an ellipse with existing selection you have either to choose intersect with selection option on the options bar or to press [Shift+Alt] keys while selecting.
While creating new selection you can constrain proportions to by pressing [Shift] key while selecting.
While New selection option is chosen and the point of cursor is within selected area the tool looks like this and can move selection.
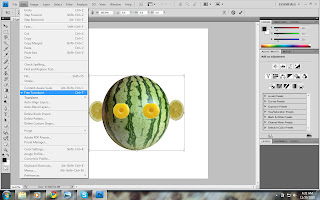

After that,im copy and paste it in a new layer,[Edit] at menu bar and choose [Transform].
I also use the same tools to the eyes and ears.


Step 3 :
I used lasso tools for extract anything from images by carefully articulating around the areas you'd like to extract. Notice this tool isn't capable of precision, there are alternative methods that are far more precise at extracting things from images stay tune.I choose red guava for the nose.


A
B
Step 4 :
I choose grape for hair.
Open an image in photoshop.
Select the magic wand tool from the Photoshop toolbox. It is the second icon on the right side and is a picture of a wand.
Choose from the boxes that follow the picture of the magic wand in the magic wand options bar by selecting the first box.
Click the color you want to select on your image.


Use the Lasso tool to adjust your selection if necessary and then copy and paste your selection into a new document.I also use the same tools for some other image like eye brow,mouth and etc.

Step 5 :
I used chili for design the basket. i put some fruit in the basket and put the basket on the head.

Monday, September 6, 2010

The Complete Birthday card


When a Chinese child turns one year old, it is a very important event. The parents might tell the baby's fortune by placing the baby in the center of a group of objects and they wait to see which object the baby picks up.ex : If the baby picked up a coin, he/she may be rich, if the baby reached for a book he/she may become a teacher, if the baby reached for the doll he/she may have many children, etc. The sixth birthday is also a special birthday for the Chinese. For the party itself, friends and relatives are invited for lunch and extra-long noodles are served to wish the birthday child a long life

Saturday, September 4, 2010

The Step How I create a birthday greeting card use Adobe Illustrator CS4


First step, import the picture to adobe illustrator cs4.
I take pen tool for start drawing balloon, chiness boy/chiness girl and birthday cap


Step two, screen shot show the progression of the outline drawing with separated layer.Now,lets fill the object and see how is shaping up.


import the music note picture. So, I click object from menu bar choose live trace and make and expand. The only thing that i need from this logo is the outer shape. So, I select the picture, right click on mouse, choose ungroup then, double click at this picture to make them in isolation mode, then select the outer shape and copy but before paste them, double click again to exit from isolation mode.

Later,i insert colour into the picture that i have drawn.


Open file and then new. After that divide into two parts A and B. In part A i will put picture and part B i will put whishes.
Part A i use gradient colour for the background. Click once on the tiny tab on the left.In the Color Window, click on the flyout menu and choose RGB or CMYK and adjust the color slider bars to whatever you like. You should see your gradient and the selected object change. Now click on the gradient slider bar tab on the right. Go to the color window and adjust again.


Part A

Part B
For final step i cut and arrange the picture and text in the part A and wishes with few picture in the part B for the final birthday card below.
I use 3D efffect for the text and picture


Friday, September 3, 2010

Assignment 3 - Birthday Card

Based on my research of birthday cards, are required to re-design the card and to add elements of local culture into the cards. The cards shall depict how birthdays are celebrated in my culture.

Resource : http://resources.childbook.com/chinese_coloring/chinese_boy_and_girl.jpg


Resource : http://www.dailyclipart.net/wp-content/uploads/medium/Birthday4.jpg


Resource : google.com


Resource:http://wcarts.files.wordpress.com/2008/04/clipart_music_notes_223_op_800x202-fulleffect_sharpen87.jpg


Birthday wishes
Resource : http://www.find-the-words.com/birthday-wishes-sample.html

Sunday, August 8, 2010

The Complete calendar


Chinese New Year is the most important Chinese festival to celebrate the New Year in Chinese lunar calendar. Chinese lunar calendar is divided into cycles of 12 years and was named after animals.

This year is equivalent to the Year of the Tiger in the Chinese calendar is hoped will inject courage and agility of the jungle hero in real life people.Tiger are physically powerful,gracious,independent and brave they are extremely bold animals. They are friendly and loving but can also selfish and short tempered.Tiger seek attention and power frequently their are envious in a relation.

Burnt firecrackers at midnight to mark the start of the new year and to drive the gnome and the bad luck.In the past, filled with bamboo sticks and gun powder burns to produce a small explosive was used in China to expel the gnome. In modern times, the method was changed to the use of firecrackers during the festive season. Firecrackers are usually tied to long ropes suspended fused. Each stick firecrackers wound up in red paper for the color red is lucky, and filled with gun powder in the core. When baked, let the sound of firecrackers exploding-strong letup. Because the number of fireworks often link hundreds of flares produce a deafening explosion believed to expel evil spirits. The lighting of firecrackers also represents a fun event and becomes an important part of Chinese New Year celebrations.